Showing posts with label scratch building. Show all posts

Wednesday, November 28, 2012

Sci Fi Corridor Tiles - some progress

When last I left this project, I had done some layouts and cut my pink foam, but had not glued anything down. Well, I got a couple of hours last night and I didn't feel like painting 1811 Spanish Militia, so I broke them out and glued them down and made some more. I'm just kinda winging this one and already its presenting some problems.

Becasue of the Industrial Edge tiles I am using, I have introduced 1/2 tiles into the way I normally would do a Hirst Arts Tile project. So its taking some getting use to. I fear I will need to make some 1-1/2 width corridors to make sure I can fill gaps that are occuring when I introduce T intersections and L corners.

But overall I am pleased with the progress.

I now have 2 big rooms (6x6), a long corridor(6x2), short corridors (3x2), L corner, 4 way intersection, and dead end or spawn point. All told 9 pieces ais a nice start. I need about 20 to play a game on. I need a couple more rooms, a coupl emore spawn/dead ends, a couple o f corners, straight halls and a t intersection. That's probably about a full day of casting to get that far..

I need to pour some more tiles and industrial edge tiles. ButI am making due with what I have poured already. I actually like the chaos of trying to put some of these pieces that are clearly meant to go vertical in as horizontal walls. Fun.


Hirst Arts. Always a fun time. I will probably make what I can from what I have and base coat them. Don't know that I will completely finish the first phase of them yet. I think then either some 15mm Fantasy or Sci Fi. Maybe take a break from Nappies for a bit. Pics have 15mm figs on the tiles. Blue Moon and Khurusan and GZG models respectively. I think the tiles look great with 15mm figs on them. Nice and spacious. Plenty of room for tactical movemnt and fire team play. Add in some Khurusan 15mm scale furniture and consloes and stuff for the rooms. And that could be fun.

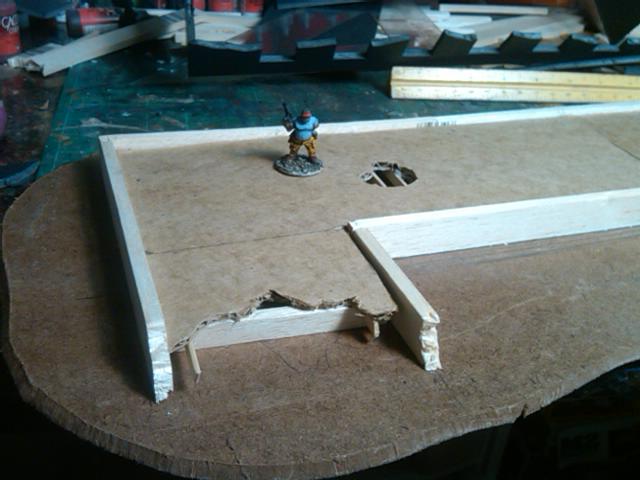
The tiles work with 28mm too. Here's an older pic with some Necromunda guys on it to show scale:


And one last shot of the Workshop of Doom's only clear space. About half a cutting mat worth. You can see it littered with some of the Hirst Arts Sci Fi molds I have poured up, pink foam blanks I have already cut for tiles, and the best hobby glue ever made - Aleen's Tacky Glue. If you don't use this stuff for terrain projects you must be crazy.


Monday, August 1, 2011

Post Apoc Building # 3 - Complete

I got a little time this weekend to finish off my ruined building. The BAron and I are planning on doing Fistful of Lead:Wasteland Warrriors for the convention, and we are gonna use my terrain and stuff. So I am desperately trying to get these done. I have 3 complete buildings, 1 more that is ready to paint, and 16 shanties for a shanty town. I have a huge governmental buidling thats built and primed, but needs butt loads of detail work. I also have about 6 more building shells if I get to them. After I complete the other building and shanty town I am going to have to make rubble and trash piles and some vegetation. I think I am good on figs.

So on with the pics.
Overall of Front

Detail of upstairs

Detail of front porch

Detail of upstairs

Detail of upstairs

Detail upstairs

Detail - rear opening

Detail - ruined stairs and building wing

Overall - rear

Detail - interior ground floor with second floor off

Overall - rear with second floor off

Detail - hole in floor with second floor off

Detail - stairs with second floor off

Detail - ruined stairs with second floor off
Overall I am pretty happy with it. Painting came out quick once I got the base colors down. and I made a couple of washes to dirty it up, which came out good too. Shanties and Post Apoc Ruin #4 is next.

Thanks for looking.

Wednesday, July 13, 2011

Update on my building

Quick update on my post apoc building. Got a good night on the rubbling of the building last night during a great mid-west thrunderstorm.


Front Overall

On the Porch

Detail of the rubble

Overall - Rear

Detail of Second Floor

Detail of First Floor by stairs

Detail of 'The Hole'

Overall - Rear

Interior Detail - First Floor

Lift Out Second Floor

Detail - Lift-off Second Floor

Detail Second Floor

Overall Second floor with 28mm fig


Overall I am pleased. I need to keep in mind the fact that these are for gaming and not miniature destroyed buildings.

I want to get this primed and painted so I can get it on the table. Hopefully I'll be hosting a game for RECRUITS this fall with this terrain. More to come. I can just feel the decay and the end of days flowing through my veins.

Monday, July 11, 2011

And what I spent most of my time on this weekend...


So as I was letting the basing material dry on my Rad Insects, and the hot glue gun was hot...I decided to bust out this:
  

 A two-story large ruin, with front porch, and a lift off second level.

The building is made up of materials I use for terrain/building projects and includes:
Balsa and Bass wood(random bulk bags from Hobby Lobby)
Single-Ply Carboard (from packing boxes)
Cocktail sticks and shapes
MDF base
Vacu Formed sheet textures(for tile, etc.)
Gatorboard( similar to foam board, but instead of paper sandwiching foam, its a thin hardboard sandwiching foam. ten time stronger than foamboard, but harder to cut.)
Hot Glue
Tacky Glue
Scatter and Rocks and whatever for rubble


Base of builing. Build up of Balsa, on a carboard floor, on an MDF base

Full base, 28mm fig

Building exterior wals roughed out. Note hangover for porch.

All exterior walls fastened to base(gatorboard). Crown molding for ceiling/floor
shown halfway up walls.

From the front, showing overhang and supports for second floor.
 
detail of first floor. Ruined stairs, and tile floor added.


Detail of hole in floor


Detail of front stairs, porch, and main entry

Rear of Building with second floor added.

Overall of rear of building.

Detail of lift-off second floor. Exposed floor joists, tile, and ruined walls.

Second floor with 28mm fig.

Detail shot of ruined stairs at first level 

Scale shot of second floor

 
Scale shot of second story overhang

So, that was about 4 hours this weekend. I am sure the insects are dry and ready to paint, but this has been too fun. Think I 'll keep going. After this, several rubble pieces, some Marx car rubble, and a selction of shanties.